
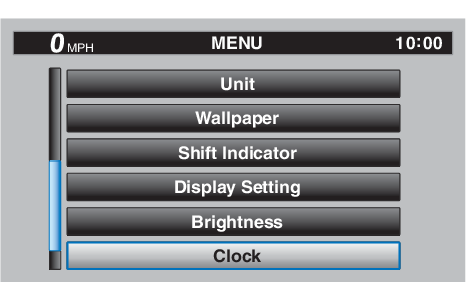
The MENU screen contains the following setting modules. Select a module to make related setting changes. Although some settings can be changed or reset via the main screen, the MENU screen offers access to all display and control settings.
| Module | Description |
| Display Mode | Switch the main screen display between street and track modes. |
| YRC Setting | Adjust YRC settings (all models) and ERS settings (YZF-R1M). |
| Lap Time | View and reset lap times. |
| Logging | Turn vehicle information logging function on/off (CCU-equipped models). |
| Maintenance | View and reset three maintenance item intervals. |
| Unit | Set fuel consumption and distance units. |
| Wallpaper | Set background colors. |
| Shift Indicator | Turn the shift indicator on/off and adjust tachometer settings. |
| Display Setting | Set the multi-function display window items. |
| Brightness | Adjust screen brightness. |
| Clock | Adjust the clock. |
| All Reset | Return all settings to factory default settings. |
MENU access and operation
The following wheel switch operations are common operations for accessing, selecting, and moving within the MENU screen and its modules.
Long push ‐ press and hold the wheel switch for one second to access the MENU screen or exit MENU entirely.
Select ‐ rotate the wheel switch up or down to highlight the desired module or setting item and then short push the wheel switch (briefly press the wheel switch inward) to confirm the selection.
Triangle mark ‐ certain setting screens have an upward pointing triangle mark item. Select the triangle mark to save setting changes made and exit that screen.
- Should vehicle motion be detected, the screen will automatically exit MENU and change to the main screen.
- To ensure that the desired setting changes are saved, be sure to exit via the triangle mark. Simply performing a long push and exiting the MENU screen entirely may not save setting changes.
“Display Mode”
There are two main screen display modes, STREET MODE and TRACK MODE.
To set the main screen display mode
-
From the MENU screen, select “Display Mode”.
-
Select “STREET MODE” or “TRACK MODE” (or select the triangle mark to exit).

-
Long push the wheel switch to exit the MENU screen or use the wheel switch to select another module.
“YRC Setting”
This module allows you to customize the four YRC modes MODE-A, MODE-B, MODE-C, and MODE-D by adjusting the setting levels (or on/off status as applicable) of YRC items PWR, TCS, SCS, LCS, QSS, LIF, EBM, and BC. For YZF-R1M, you can select the ERS mode to be associated with each YRC mode, and also adjust the setting levels of the ERS modes.
- The traction control system has 9 setting levels and ERS has 6 modes.
- Whenever there are more selections (setting levels or modes) available than can be shown on the screen at one time, a scroll bar will appear to notify you that additional selections are available by scrolling.
PWR
Select PWR-1 for the most aggressive throttle response, PWR-2 and PWR-3 for smoother throttle grip/engine response, and use PWR-4 for rainy days or whenever less engine power is desirable.

- PWR 1
- PWR 2
- PWR 3
- PWR 4
- Throttle valve opening
- Throttle grip operation
Traction control system
This model uses a variable traction control system. For each setting level, the further the vehicle is leaned over, the greater the amount of traction control (system intervention) is applied. There are 9 setting levels available. Setting level 1 applies the least amount of overall system intervention, while setting level 9 applies the greatest amount of overall traction control.
- The traction control system can only be turned on or off via the main screen using the mode switch.
- When the traction control system has been turned off; SCS, LCS, and LIF will also be set to OFF and cannot be adjusted. When the traction control system is turned on again, these related-traction control functions will return to their previous setting levels.

- System intervention
- Lean angle
SCS
SCS can be set to OFF, 1, 2, and 3. OFF turns the slide control system off, setting level 1 provides the least amount of system intervention, and setting level 3 provides the greatest amount of system intervention.

- System intervention
- Sideward slide
LCS
LCS can be set to 1, 2, or OFF. Setting level 1 keeps engine speed from rising above 9000 r/min even when the throttle grip is fully turned. Setting level 2 keeps engine speed from rising above 8000 r/min. OFF disables the LCS function from the selected YRC mode (the LCS icon will not appear and the launch control function cannot be activated).
When LCS has been set to level 1 or 2 for the selected YRC mode, the LCS indicator on the main screen will appear in a grey color to indicate that LCS is available. When the launch control system has been activated (made ready for use via the mode switch), the LCS indicator will turn white.
LCS works in conjunction with the LIF system. LCS cannot be used if LIF is turned off.
Quick shifter
The quick shifter is divided into QS  (upshift) and QS
  (downshift) sections. QS and QS are not linked and can be independently turned on or off.
QS can be set to 1, 2, or OFF. Setting level 1 is designed for maximum acceleration, while setting level 2 is designed to give smooth shifts at halfway or less throttle openings. OFF turns the respective upshift or downshift function off, and the clutch lever must then be used when shifting in that direction.
- Set QS to 1 for track or sporty riding.
- Set QS to 2 for touring or around town-riding.
LIF
LIF can be set to 1, 2, 3, or OFF. Setting level 3 most strongly reduces wheel lift, and setting level 1 provides the least amount of system intervention. OFF turns LIF off and LCS will be disabled for the selected YRC mode.
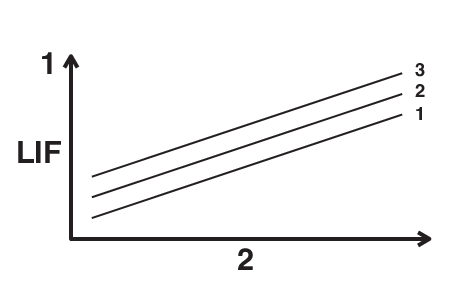
- System intervention
- Wheel lift
EBM
This system has three settings. Level 1 provides the least amount of engine brake management intervention, and therefore the strongest amount of engine braking. Level 3 provides the greatest amount of engine brake management intervention, and therefore the least amount of engine braking.
BC
Select BC1 when only standard ABS is desired. Select BC2 to have the brake control system regulate brake pressure while cornering to suppress lateral wheel slip.
For skilled riders and when riding at the track, due to varying conditions BC2 brake system engagement may come on sooner than expected relative to your desired cornering speed or intended cornering line.
To customize a YRC mode or adjust a YRC item
-
From the MENU screen, select “YRC Setting”.

-
The “YRC Setting” screen is displayed, and the YRC mode box “YRC” is highlighted. Short push the wheel switch to enter the box and then select the YRC mode A, B, C, or D that you want to adjust.

- Triangle mark
- YRC mode box
- YRC item
- ERS mode (YZF-R1M)
- To ERS menu (YZF-R1M)
-
Select the YRC item PWR, TCS, SCS, LCS, QS
, QS , LIF, EBM, BC, or ERS (YZF-R1M) that you want to adjust.
- YRC item
- Current level setting
- Factory preset level
- YRC mode
- When a YRC item is selected, the current setting level is indicated by a blue-framed square and the factory preset level is indicated in a grey box.
- Factory preset levels vary depending on the selected YRC mode.
-
To customize other YRC modes or adjust individual YRC items, repeat from step 2. When finished, select the triangle mark on the far left to return to the MENU screen; or for YZF-R1M select the “
 ” mark to fine tune the ERS mode settings.
ERS (YZF-R1M)

- ERS mode
- Braking support level
- Cornering support level
- Acceleration support level
- Front overall damping level
- Rear overall damping level
- Factory preset level
- Current level
The ERS consists of three semi-active automatic modes (T-1, T-2, and R-1) and three manual setting modes (M-1, M-2, and M-3). When an automatic mode is selected, the SCU will adjust the compression and rebound damping forces based on running conditions. For all modes and models, spring preload is physically adjusted by hand. (See pages and .)
For track modes T-1 and T-2, the following settings can be adjusted:
BRAKE SUPPORT: reduces nosedive (front-end pitch from braking)
CORNER SUPPORT: increases damping to absorb chassis fluctuations for smooth cornering. Reduce this setting for increased rear wheel grip.
ACCEL SUPPORT: reduces rear-end squat (rear-end pitch due to acceleration)
FRONT FIRM: hardens (H) or softens (S) overall damping of the front suspension
REAR FIRM: hardens (H) or softens (S) overall damping of the rear suspension

- ERS mode
- Braking support level
- Front overall damping level
- Rear overall damping level
- Factory preset level
- Current level
For the road mode R-1, the following settings can be adjusted:
BRAKE SUPPORT: reduces nosedive (front-end pitch from braking)
FRONT FIRM: hardens (H) or softens (S) overall damping of the front suspension
REAR FIRM: hardens (H) or softens (S) overall damping of the rear suspension
- T-1 is preset for track use with racing slick tires.
- T-2 is preset for track use with street tires.
- R-1 is preset for road use with street tires.

- ERS mode
- Front compression damping force
- Front rebound damping force
- Rear compression damping force
- Rear rebound damping force
- Factory preset level
- Current level setting
For the manual setting modes M-1, M-2, and M-3, the following settings can be adjusted:
Fr COM: front compression damping
Fr REB: front rebound damping
Rr COM: rear compression damping
Rr REB: rear rebound damping
- M-1 is preset for track use with racing slick tires.
- M-2 is preset for track use with street tires.
- M-3 is preset for street use with street tires.
To adjust the ERS mode settings

- To ERS menu
- Manual modes
- Automatic modes
The ERS setting menu is divided into automatic and manual setting modes, and the two types are accessed separately. Before moving to the ERS setting menu, make sure the current ERS mode corresponds to the same type (automatic or manual) that you want to adjust.
-
Select the “
” mark located to the right of ERS. -
The display will change to the relevant suspension setting screen and the ERS mode selection box “SETTING” is highlighted. Short push the wheel switch to enter the box and select the ERS mode that you want to adjust.

- To YRC Setting menu
- ERS mode selection box “SETTING”
- Factory preset level
- Current level setting
-
Select the suspension item that you want to adjust, and then rotate the wheel switch to adjust the setting level.
All ERS modes regardless of type are independent. Offset level setting changes made in one mode are not transferred to another mode.
-
To adjust other ERS modes of the same type, repeat from step 1. To switch types or when finished, select the “
 ” mark to return to the main “YRC Setting” menu.
“Lap Time”
This module allows you to view and delete the lap time record. The fastest lap and the average lap time stored in the lap time record are displayed at the top of the screen. Use the wheel switch to scroll and see all lap times. The top three fastest laps will be highlighted in silver. Up to 40 laps can be stored in memory. If more than 40 laps are recorded, the oldest laps (starting from lap 1) will be overwritten.

This module has two options. “Display” allows you to view the lap time record. “Reset” allows you to delete the lap time record data.

To view the lap time record data
-
Select “Display”.

- Fastest lap
- Average lap time
- Lap time record
To reset the lap time record data
-
Select “Reset”.

-
Select “YES” to delete all lap time data. (Select “NO” to exit and return to the previous screen without resetting the lap record.)

“Logging” (CCU-equipped models)
Vehicle and riding information can be recorded (logged) and this data can be accessed with a smart device (see “CCU” on page ).
To start and stop logging
-
From the MENU screen, select “Logging”.

If a CCU is not installed, then the “Logging” module cannot be selected.
-
Select “START” to start logging.
The arrow of the logging indicator is displayed in green.

- Logging indicator
-
To stop the “Logging” function, select “STOP” or turn the vehicle off.

The logging function will also start automatically when you start off.
“Maintenance”
This module allows you to record distance traveled between engine oil changes (use the OIL item), and for two other items of your choice (use INTERVAL 1 and INTERVAL 2).
To reset a maintenance item
-
From the MENU screen, select “Maintenance”.

-
Select the item you want to reset.

-
Long push the wheel switch to reset the item.

Maintenance item names cannot be changed.
“Unit”
This module allows you to switch the display between kilometers and miles.
When using kilometers, the fuel consumption units can be changed between km/L or L/100km. When using miles, MPG will be available.
To set the distance or fuel consumption units
-
From the MENU screen, select “Unit”.

-
Select the distance or consumption unit item you want to adjust.

When “km” is selected, “km/L” or “L/100km” can be set as the fuel consumption units. To set the fuel consumption units, proceed as follows. If “mile” is selected, skip step 3.
-
Select the units you want to use.

-
Select the triangle symbol to exit.
“Wallpaper”
This module allows you to individually set the STREET MODE and TRACK MODE display background colors to black or white for both day and night settings. A photo sensor equipped in the instrument panel detects lighting conditions and will automatically change the display between its day and night settings. The photo sensor also controls a subtle automatic brightness adjustment function within both day and night modes to suit ambient light conditions.
- Photo sensor
To set the wallpaper
-
From the MENU screen, select “Wallpaper”.

-
Select the mode you want to adjust (select DAY for daytime display settings or NIGHT for nighttime display settings).

-
Select the background color (select “BLACK” for a black background or “WHITE” for a white background).

-
Select the triangle symbol to exit.
-
To set another background color, repeat from step 2 or select the triangle symbol to exit this module.
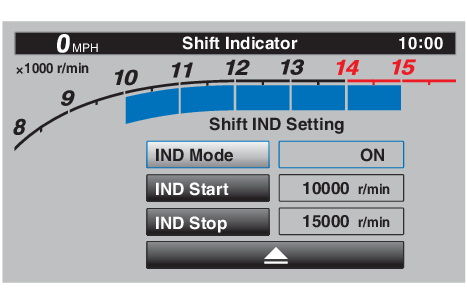
“Shift indicator”
The shift indicator module contains the following modules.
| Module | Description |
| Shift IND Setting | Set the shift indicator pattern to “ON”, “Flash”, or “OFF” and adjust at what r/min the indicator will come on and go off. |
| Shift IND Brightness | Adjust the brightness of the shift indicator. |
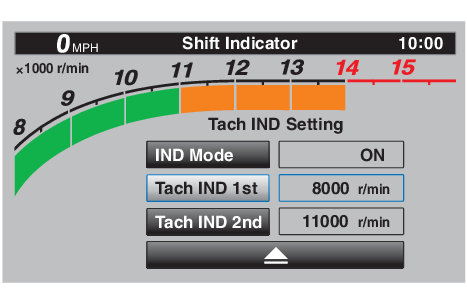
| Tach IND Setting | Set the tachometer color display to “ON” or “OFF” and adjust at what r/min the tachometer will be green and orange. |
| Peak Rev IND Setting | Set the tachometer peak rev indicator to “ON” or “OFF”. |

To make setting changes
-
Select “Shift IND Setting”.

-
Select “IND Mode”.
-
Select “ON” to have the indicator light steadily, “OFF” to turn the indicator off, or “Flash” to have the shift indicator flash when the indicator start threshold has been reached.

-
Select “IND Start”.

-
Rotate the wheel switch to adjust the r/min at which the shift timing indicator light will come on. “IND Start” operational range is 8000–14800 r/min.

-
Select “IND Stop”, and then rotate the wheel switch to adjust the r/min at which the shift timing indicator will go off. “IND Stop” operational range is 8500–15000 r/min.
The blue area on the tachometer indicates the currently set operational range of the shift indicator light.
“Shift IND Brightness”
The shift timing indicator light has six brightness levels.

Select “Shift IND Brightness”, then use the wheel switch to adjust the setting. Short push the wheel switch to confirm the setting and exit.

“Tach IND Setting”
This module allows you to turn the tachometer color display on or off. When turned off, the tachometer will display all r/min levels below the red zone in black or white (depending on wallpaper settings). When turned on, the mid and mid-to-high r/min zones can be set to come on in green and then orange colors.
-
Select “Tach IND Setting”.

-
Select “IND Mode”.

-
Select ON to turn the tachometer color display mode on (or select OFF to turn this function off).

-
Select “Tach IND 1st” to set the green zone starting r/min.
-
Set the starting r/min by rotating and then short pushing the wheel switch. All r/min above this value up to the “Tach IND 2nd” setting value (or the 14000 r/min red zone), will be displayed in green.
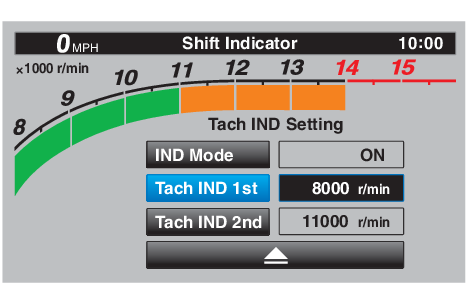
Green bar start setting range: 8000–10000 r/min.
-
Select “Tach IND 2nd”.
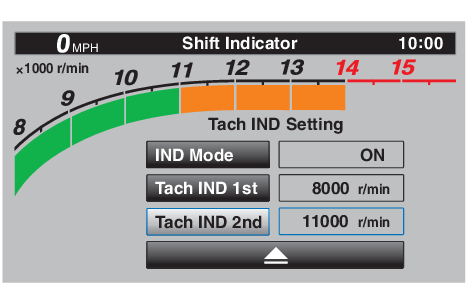
-
Set the orange color starting r/min by rotating and then short pushing the wheel switch. All r/min above this figure until the 14000 r/min red zone, will be displayed in orange.
Orange bar start setting range: 8000–14000 r/min.

-
Select the triangle symbol to exit.
“Peak Rev IND Setting”
This module allows you to turn the revolution peak hold indicator on or off.
-
Select “Peak Rev IND Setting”.

-
Select “IND Mode” and then select ON (to turn on the indicator) or OFF (to turn off the indicator).
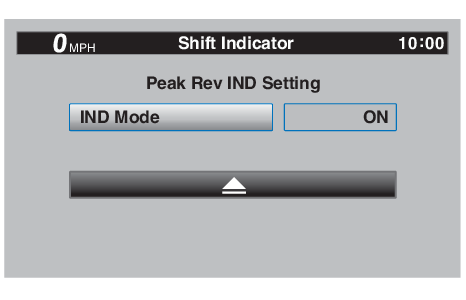
-
Select the triangle symbol to exit.
“Display Setting”
This module allows you to set how the information display items (like TRIP-1, ODO, C. TEMP, etc.) are grouped on the main screen. There are four display groups.

- Information display item (STREET MODE)

- Information display item (TRACK MODE)
To set the display groups
-
From the MENU screen, select “Display Setting”.

-
“DISPLAY-1”, “DISPLAY-2”, “DISPLAY-3” and “DISPLAY-4” are displayed.

-
For example, let’s select “DISPLAY-1”.
-
Select “STREET MODE 1-1”.

-
Select the desired information display item with the wheel switch.

The information display items which can be selected are:
A.TEMP: air temperature
C.TEMP: coolant temperature
TRIP-1: tripmeter 1
TRIP-2: tripmeter 2
ODO: odometer
FUEL CON: the amount of fuel consumed
FUEL AVG: average fuel consumption
CRNT FUEL: current fuel consumption
-
Select “STREET MODE 1-2” or “TRACK MODE” to set the remaining DISPLAY-1 group items.

-
Select the triangle symbol to exit. To set the other display groups, repeat from step 3.
“Brightness”
This module allows you to adjust the general brightness level of the display screen.
To set the brightness
-
From the MENU screen, select “Brightness”.

-
Select the desired brightness level by rotating the wheel switch, and then short push the wheel switch to fix the setting.

“Clock”
This module allows you to set the clock.
To set the clock
-
From the MENU screen, select “Clock”.
-
When “Clock” is selected, the hours figure will be highlighted.

-
Set the hour by rotating and then short push the wheel switch.

-
The minutes figure will become highlighted.

-
Set the minutes figure by rotating and then short push the wheel switch.

-
Short push the wheel switch again to exit and go back to the MENU screen.
“All Reset”
This module resets everything, except the odometer and clock, to its factory preset or default setting.
Select YES to reset all items. After selecting YES, all items will be reset and the screen will automatically return to the MENU screen.