The display has two different main screen display modes, STREET MODE and TRACK MODE. Most of the functions are viewable in either mode, but the layout differs slightly. The following items can be found on the display.
- Speedometer
- Tachometer
- Information display
- Transmission gear display
- Front brake pressure indicator
- Acceleration indicator
- YRC setting display MODE/PWR/TCS/SCS/EBM
- YRC setting display LCS/QS/LIF/BC
- ERS indicator (YZF-R1M)
- GPS indicator (CCU-equipped models)
- Logging indicator (CCU-equipped models)
- Clock
- Revolution peak hold indicator
- Lap timer
- Various warning icons
- Error mode warning “Err”
This model uses a thin-film-transistor liquid-crystal display (TFT LCD) for good contrast and readability in various lighting conditions. However, due to the nature of this technology, it is normal for a small number of pixels to be inactive.
STREET MODE

- YRC items LCS/QS/LIF/BC
- Speedometer
- GPS indicator (CCU-equipped models)
- Logging indicator (CCU-equipped models)
- Clock
- Revolution peak hold indicator
- Front brake pressure indicator
- Acceleration indicator
- Transmission gear display
- ERS indicator (YZF-R1M)
- YRC items MODE/PWR/TCS/SCS/EBM
- Information display
- Tachometer
TRACK MODE

- YRC items LCS/QS/LIF/BC
- Lap timer
- GPS indicator (CCU-equipped models)
- Logging indicator (CCU-equipped models)
- Clock
- Transmission gear display
- Information display
- ERS indicator (YZF-R1M)
- YRC items MODE/PWR/TCS/SCS/EBM
- Speedometer
- Tachometer
Stop the vehicle before making any setting changes. Changing settings while riding can distract the operator and increase the risk of an accident.
Speedometer
The speedometer shows the vehicle’s traveling speed.
The display can be switched between kilometers and miles. See “Unit” on page .
Tachometer
The tachometer shows the engine speed, as measured by the rotational velocity of the crankshaft, in revolutions per minute (r/min).
- In TRACK MODE, the tachometer starts at 8000 r/min.
- In STREET MODE, the tachometer can be color-adjusted and has a revolution peak hold indicator which can be turned on or off.
Do not operate the engine in the tachometer red zone.
Red zone: 14000 r/min and above
Information display
This section of the main screen is used to show additional riding related information such as air and coolant temperature readings, tripmeters, and fuel consumption statistics. The information display items can be set into four groups via the MENU screen.
The information display items are:
A.TEMP: air temperature
C.TEMP: coolant temperature
TRIP-1: tripmeter 1
TRIP-2: tripmeter 2
F-TRIP: fuel tripmeter
ODO: odometer
FUEL CON: the amount of fuel consumed
FUEL AVG: average fuel consumption
CRNT FUEL: current fuel consumption
- ODO will lock at 999999 and cannot be reset.
- TRIP-1 and TRIP-2 will reset to 0 and begin counting again after 9999.9 has been reached.
- When the fuel tank reserve level has been reached, F-TRIP appears automatically and begins recording distance traveled from that point.
- After refueling and traveling some distance, F-TRIP will automatically disappear.
- See “Unit” on page to change the fuel consumption units.
- The air temperature displayed may vary from the actual ambient temperature.
- In TRACK MODE, information display items FASTEST (fastest lap time) and AVERAGE (average lap time) are also available.
TRIP-1, TRIP-2, F-TRIP, FUEL CON, and FUEL AVE items can be individually reset.
To reset information display items
-
Use the wheel switch to scroll through the display items until the item you want to reset appears.
-
Short push the wheel switch and the item will flash for five seconds. (For STREET MODE, if both items are resettable items, the top item will flash first. Scroll down to select the bottom item.)
-
While the item is flashing, press and hold the wheel switch for one second.
Transmission gear display
This shows which gear the transmission is in. This model has 6 gears and a neutral position. The neutral position is indicated by the neutral indicator light “ ” and by the transmission gear display “”.
Front brake pressure indicator
This shows how much braking power is being applied to the front brakes.
Acceleration indicator
This shows the vehicle’s forward acceleration and deceleration forces.
Revolution peak hold indicator
This small bar momentarily appears within the tachometer to mark the most recent peak engine speed.
YRC items
MODE/PWR/TCS/SCS/EBM
The current MODE (YRC mode) and its related PWR, TCS, SCS, and EBM settings are shown here.
The individual settings for YRC items PWR, TCS, SCS, LCS, QSS, LIF, EBM, and BC can be organized into four groups and set independently for each group. These groups of settings are the YRC modes MODE-A, MODE-B, MODE-C, and MODE-D. Use the mode switch to change YRC modes or make YRC item setting changes from the main screen.
The YRC modes come preset from the factory for different riding conditions. When using the factory presets, the suggested YRC modes are as follows.
MODE-A: suitable for track riding
MODE-B: softer track-riding setting
MODE-C: suitable for road use
MODE-D: street use or rainy weather
To change YRC modes or make setting changes
-
Push the mode switch center button to scroll left to right and highlight the item you want to adjust.

- Mode switch “MODE”
- Up button
- Center button
- Down button
-
Use the mode switch up button or down button to change the selected item value (vertical scrolling is not possible).
- When the engine trouble warning light is on, YRC settings cannot be adjusted.
- When a YRC function is actively engaged that item cannot be adjusted. For example, when decelerating EBM cannot be adjusted.
- When a YRC item is highlighted but cannot be adjusted, the YRC item box will return to black.

To turn off the traction control system, select TCS with the center button, then push and hold the up button until TCS OFF is displayed. To turn the traction control system back on, select TCS OFF and then press the down button (the traction control system will return to its previous setting).
Turning off the traction control system will turn off the SCS, LCS, and LIF systems for all YRC modes.
YRC items LCS/QS/LIF/BC
The on/off status of YRC items LCS, QSS, LIF, and BC is shown here. When any of these systems are registered (not set to OFF) for the currently selected YRC mode, its respective icon will appear.
When LCS is registered for the currently selected YRC mode, its icon will be grey. To activate the launch control system, press and hold the center button until the LCS icon stops flashing and turns white.
LCS, QSS, LIF, and BC system setting levels can only be adjusted from the MENU screen.
ERS indicator “ ” (YZF-R1M)
This icon shows the current ERS mode. (See “YRC Setting” on page and “ERS” on page to change the registered ERS mode or adjust ERS setting levels.) If the ERS mode disappears from the ERS indicator (the icon turns blank), stop the vehicle and wait a few seconds until the mode reappears.
- The suspension will remain fixed at its most recent settings until self-reset has completed.
- If the ERS indicator does not return to normal, have a Yamaha dealer inspect the vehicle.
GPS indicator “ ”
”
(CCU-equipped models)
This icon comes on when a GPS unit is synched with your vehicle.
Logging indicator “ ”
”
(CCU-equipped models)
This icon comes on when vehicle data is being recorded via the logging function.
Clock
The clock uses a 12-hour time system.
Lap timer
This stopwatch function measures and records up to forty laps. On the main screen, the lap timer shows the current lap time and lap number (indicated by the LAP mark). Use the Pass/LAP switch to mark lap times. When a lap is completed, the lap timer will show the latest lap time (marked by the LATEST indicator) for five seconds.

- Lap time
- Latest lap time indicator “LATEST”
- Information display item
- Lap number
To use the lap timer
-
Short push the wheel switch. The information display item will flash for five seconds.
-
While the information display item is flashing, rotate the wheel switch upward. The lap timer will flash for five seconds.
-
While the lap timer is flashing, long push the wheel switch to activate the lap timer or stop the lap timer.
-
When the lap timer has been activated, press the Pass/LAP switch to start the lap timer.
- The engine must be running to use the lap timer.
- Set the information display to FASTEST or AVERAGE for additional lap time information.
- Accessing the MENU screen will automatically stop the lap timer.
- Whenever the lap timer is stopped, the current lap will not be recorded.
- The lap time record can be viewed and reset from the MENU screen.
Warning icons
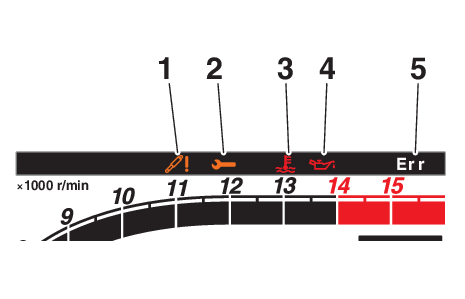
- SCU trouble warning “
 ”
” - Auxiliary system warning “
 ”
” - Coolant temperature warning “
 ”
” - Oil pressure warning “
 ”
” - Error mode warning “Err” (replaces clock when activated)
When an error is detected, the following error-related warning icons will then be viewable.
SCU trouble warning “” (YZF-R1M)
This icon appears if a problem is detected in the front or rear suspension.
Auxiliary system warning “”
This icon appears if a problem is detected in a non-engine-related system.
Coolant temperature warning “”
This icon appears if the coolant temperature reaches 117 °C (242 °F) or higher. Stop the vehicle and turn off the engine. Allow the engine to cool.
Do not continue to operate the engine if it is overheating.
Oil pressure warning “”
This icon appears when the engine oil pressure is low. When the vehicle is first turned on, engine oil pressure has yet to build, so this icon will come on and stay on until the engine has been started.
If a malfunction is detected, the oil pressure warning icon will flash repeatedly.
Do not continue to operate the engine if the oil pressure is low.
Error mode warning “Err”
When an internal error occurs (e.g., communication with a system controller has been cut off), the error mode warning will appear as follows.
“Err” and “” indicates an ECU error.
“Err” and “” indicates an SCU error.
“Err” only indicates an ABS ECU error.
Depending on the nature of the error, the display may not function properly and YRC settings may be impossible to change. Additionally, ABS may not function properly. Use extra care when braking and have a Yamaha dealer check the vehicle immediately.